How To Replace Nozzle of Creality 3D Printer Cr-10 v3, Ender 3/5 And etc
With the Creality series of printers, you can change the nozzle, choosing which one best suits your needs. Here we will guide you through choosing the right nozzle size for your 3D printer. You’ll also learn how to replace the nozzle on a 3D printer. In this guide, you have to do the same steps for Creality 3D printers as discussed at the bottom of this article, including Ender5, Ender 3, CR-10s, and many more.
If you’re a Creality 3D printer user, you’ll need to know how to replace or change the nozzle on your printer. Nozzles can wear out over time or become blocked, leading to poor print quality. This blog post will show you exactly how to replace the nozzle on a Creality 3D printer and which nozzle size will be perfect for you. Let’s begin!
Read: The Best Creality 3D Printers of 2022 | Discover The Perfect One!
How To Choose The Right Nozzle Size
There will be two main factors in choosing the best size for your Creality printer.
- First, the nozzle size depends on your needs.
- Secondly, you can choose a variety pack of nozzles from this kit and start with 0.6mm or 0.5mm if you are not sure which one to use.
Choosing the correct nozzle size for your Creality printer is critical for 3D printing. Depending on the types of models you wish to print, you should decide which nozzle size is appropriate for your printer. Different nozzle sizes have their benefits and drawbacks.
Larger Nozzles:
- Printing large models will require significantly less time if you can use larger layer heights
- This generally leads to more robust prints
- There are more rough details and finishes
Smaller Nozzles:
- You can Print Fine details with ease
- In general, a smaller nozzle is better for prints with support material since support material removes more easily.
- The leveling of the print bed requires more precision.
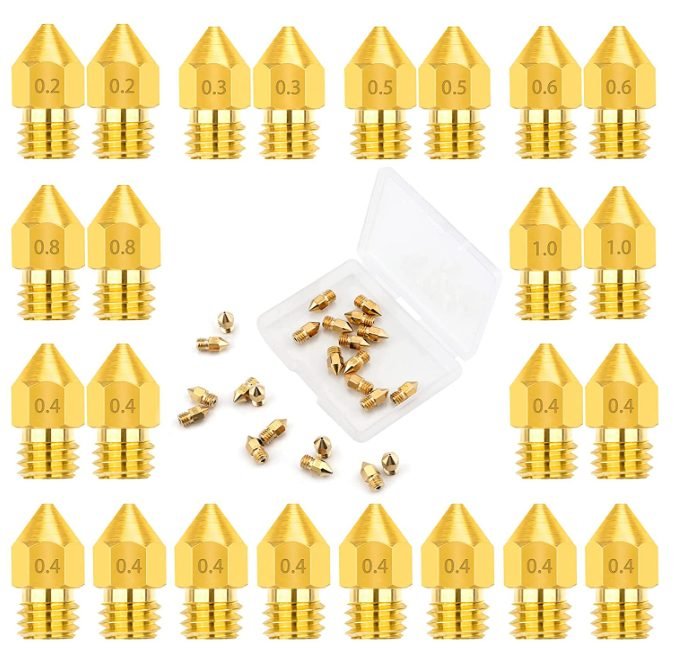
The sizes of most nozzles range from 0.2mm to 0.8mm. The standard Creality CR-10 Nozzle uses a balanced size nozzle of 0.4mm. If you want to print large models like 250mm or more, we recommend you use a 0.6mm nozzle, which will give you the best results for large build volume. Our experienced shows that a 0.5mm nozzle balances speed and renders detail satisfactorily.
When choosing a nozzle size, we recommend starting with a 0.5mm nozzle if you are unsure which one is best. You might decide to upgrade to a 0.8 mm nozzle if you believe you’ll be printing large models frequently to utilize the build volume of the CR-10 fully.
Buy Your Nozzle
You can buy these nozzles on Amazon. They have very cheap in price.
With the CR-10, you can choose between various sizes and types of 3D printing nozzles. We recommend this variety pack to provide you with a variety of nozzle sizes to experiment with. So, you can design flexibly.

Nozzles made of stainless steel or other materials are not recommended for general use because of their less conductivity than brass. While steel ones are more durable, they should be used only on abrasive filaments, such as metal fill or wood fill.
It is advisable to have at least one spare nozzle on hand. As nozzles wear out, the print quality will gradually become inconsistent. The nozzle can also become clogged by plastic or another obstruction. Generally, when these issues arise, the best thing to do is just replace the nozzle.
Recommended: How To Pick The Best Filament For Creality 3D Printers | Complete Guide
How To Remove The Old Nozzle
- It is recommended that you heat up the nozzle to 250C, and then turn it off.
- You will need to remove the nozzle with the help of a wrench

The first step in changing the nozzle on your printer is to remove the current nozzle. To do this, you must first heat the nozzle to 250C using the printer controller. It will then be easier to unscrew the nozzle later.
The nozzle heat should be set to 0C using the printer controller when the temperature reaches 240C. Remove the existing nozzle once you have turned off the heat.
CR-10 and Ender 3 heater blocks are secured with two bolts, so you don’t need to worry about breaking them when removing the nozzle. Many 3D printers, including the CR-10S Pro, do not have these bolts. Holding the heater block with pliers or a wrench will allow you to remove the nozzle from this printer.
To remove the nozzle, you can use either the wrench that came with your printer or a crescent wrench. This nozzle wrench from Amazon is convenient if you plan on changing the nozzles often. It allows you to remove and replace nozzles very easily. Whenever you remove the nozzle from the heater block, it will still be very hot as it has just come off the heater block. The nozzle is so cheap to replace; that’s why you can discard it, or if you want to reuse it, save the nozzle.
How to Attach The New Nozzle to Creality Printers
- Hand-tighten the Nozzle
- The nozzle should be heated up to 250C, then turned off
- Tighten the nozzle with a wrench

In the same manner, screw the new nozzle into the heater block. When the heater block is still hot, you might be able to do this with the wrench, but we usually let it cool below 100C for a few moments before beginning to screw the nozzle in.
Using the printer controller, heat the nozzle again to 250C after the nozzle is partially screwed in. Turn off the heater when the nozzle reaches 250C, then tighten the nozzle with a wrench.
Ender 3 Nozzle Replacement
To change the nozzle on an Ender 3 3D printer or Ender 3 pro, follow these steps:
- Heat the printer’s hot end to the temperature at which you normally print with the current nozzle. This will make it easier to remove the old nozzle and prevent damage to the hot end or the new nozzle.
- Use a wrench or pliers to loosen the nozzle from the hot end. Be careful not to damage the threads on the hot end or the nozzle.
- Once the old nozzle is loose, remove it from the hot end and set it aside.
- Carefully screw the new nozzle into the hot end, making sure not to cross-thread it. Use the wrench or pliers to tighten it securely.
- Once the new nozzle is in place, allow the hot end to cool down to a safe temperature. Then run a test print to make sure the new nozzle is working properly.
If you’re not comfortable with Ender 3 nozzle change by yourself, you can also have it done by a professional or at a 3D printing service center. It’s also a good idea to have a spare nozzle on hand in case you need to replace it again in the future.
Read: Resin Vs. Filament 3D Printer | Which Is Better For You?
Keep Remember!
Congratulations on completing the nozzle-changing process! It’s time to go print something and see how your new nozzle fits. Make sure you change any size settings in 3D model slicing software, then get printing right away so that we can celebrate when our work is done together 🙂

Selena Richard
Selena Richard is a tech blogger and entrepreneur who is passionate about new technologies. She has a keen interest in 3D printing and sublimation printers, which she uses to design crafts and solve problems for small business owners.
Selena provides simple and effective solutions for small business growth. With a team of expert members, she targets the needs of small business owners and takes pride in her work.


